Add Swagger to your Spring Boot 3 application to easily document and consume your REST API
- Mar 22, 2023
- 3 min read
Updated: Mar 27, 2023
By Michał Łoza, Engineering Manager
Often when you are developing Spring Boot Application you need to expose REST API to be consumed by frontend or some other application written by someone else. You need to tell them how to use your API, and have a way to easily test it by calling methods from this API. And this is where Swagger comes to play.
What is Swagger?
Swagger is a tool that provides a simple, interactive and easy-to-use interface for creating and testing APIs. You can describe the structure of your API using a common language called OpenAPI, which can be written in JSON or YAML. This makes it easy for other developers to understand and use your API. When it comes to integration with Spring Framework, we can use SpringDoc to automatically generate OpenAPI file. That way, it’s even easier to maintain this documentation and keep it up to date.
Spring Boot Application
Let’s start by creating a simple Spring Boot application that would expose 4 endpoints:
GET: list tasks
POST: create task
PUT: update task
DELETE: delete task
@RestController
@RequestMapping("/tasks")
public class TaskController {

    Map<UUID, TaskDocument> tasksDatabase = new HashMap<>();

    @GetMapping
    public Collection<TaskDocument> listTasks() {
        return tasksDatabase.values();
    }

    @DeleteMapping("{id}")
    @ResponseStatus(NO_CONTENT)
    public void deleteTask(@PathVariable("id") UUID id) {
        tasksDatabase.remove(id);
    }

    @PostMapping
    @ResponseStatus(CREATED)
    public void createTask(@RequestBody TaskDocument task) {
        UUID key = UUID.randomUUID();
        tasksDatabase.put(key, new TaskDocument(key, task.name(), task.done()));
    }

    @PutMapping("{id}")
    @ResponseStatus(NO_CONTENT)
    public void updateTask(@PathVariable("id") UUID id, @RequestBody TaskDocument task) {
        tasksDatabase.computeIfPresent(id, (key, document) -> new TaskDocument(key, task.name(), task.done()));
    }

    record TaskDocument(UUID id, String name, boolean done) {

    }

}
We can test it now using CURL:
➜ curl http://localhost:8080/tasks
[]
➜ curl -XPOST -d '{"name": "task 1"}' -H 'content-type: application/json' http://localhost:8080/tasks
➜ curl http://localhost:8080/tasks
[{"id":"c659e3c3-4b5c-4bd7-b963-7d7863d4c420","name":"task 1","done":false}]
curl -XPUT -d '{"name": "task 1", "done": true}' -H 'content-type: application/json' http://localhost:8080/tasks/c659e3c3-4b5c-4bd7-b963-7d7863d4c420
➜ curl http://localhost:8080/tasks
[{"id":"c659e3c3-4b5c-4bd7-b963-7d7863d4c420","name":"task 1","done":true}]
➜ curl -X DELETE -H 'content-type: application/json' http://localhost:8080/tasks/c659e3c3-4b5c-4bd7-b963-7d7863d4c420
➜ curl http://localhost:8080/tasks
[]
Everything is working, but if you don’t know the structure of the API, you won’t be able to call those endpoints. And here comes Swagger.
Adding Swagger to project
SpringDoc dependencies
To add swagger to the project, we need to start with adding SpringDoc dependency to our project.
Maven:
   <dependency>
      <groupId>org.springdoc</groupId>
      <artifactId>springdoc-openapi-starter-webmvc-ui</artifactId>
      <version>2.0.2</version>
   </dependency>
Gradle:
implementation group: ‘org.springdoc’, name: ‘springdoc-openapi-starter-webmvc-ui’, version: ‘2.0.2’After restarting the application, you can access swagger under address: http://localhost:8080/swagger-ui/index.html
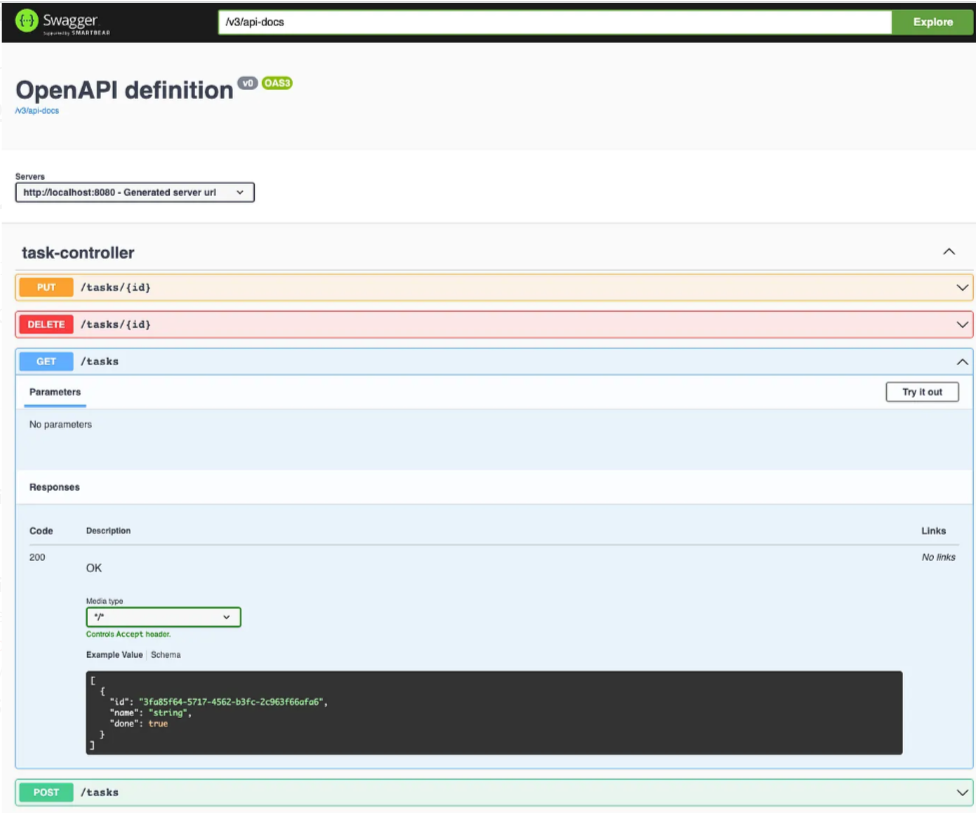
As you can see, it automatically detected all endpoints, parameters and data structures used in API. You can also see Open API file opening URL: http://localhost:8080/v3/api-docs
Application Configuration
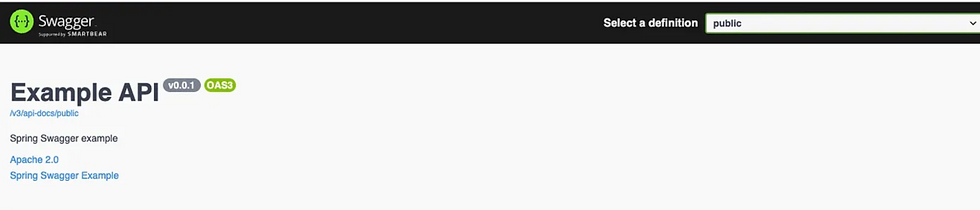
You can configure name, license, group your API methods by providing beans in your application configuration. Take a look at the example.
@Configuration
public class SwaggerConfiguration {

    @Bean
    public GroupedOpenApi publicApi() {
        return GroupedOpenApi.builder()
                .group("public")
                .pathsToMatch("/**")
                .build();
    }

    @Bean
    public OpenAPI springSwaggerExample() {
        return new OpenAPI()
                .info(new Info().title("Example API")
                        .description("Spring Swagger example")
                        .version("v0.0.1")
                        .license(new License().name("Apache 2.0").url("http://example.com")))
                .externalDocs(new ExternalDocumentation()
                        .description("Spring Swagger Example")
                        .url("https://example.com/docs"));
    }
}
This would allow you to define how header of Swagger will look like. After applying those changes, my header looks like this.
Documenting your API
At this point, you can see auto-generated API structure. Using annotations in code, you can add more information to the endpoints. Let’s try to add more information to our controller, PUT method and document.
@RestController
@RequestMapping("/tasks")
@Tag(name = "Tasks", description = "API to manipulate tasks") // 1
public class TaskController {

    // ....

    @PutMapping("{id}")
    @ResponseStatus(NO_CONTENT)
    @Operation(summary = "updates existing task") // 2
    @ApiResponses(value = { // 3
            @ApiResponse(responseCode = "204", description = "task updated")
    })
    public void updateTask(
            @PathVariable("id") @Parameter(description = "id of task that should be updated") UUID id, // 4
            @RequestBody TaskDocument task) {
        tasksDatabase.computeIfPresent(id, (key, document) -> new TaskDocument(key, task.name(), task.done()));
    }

    @Schema(description = "Task definition document") // 5
    record TaskDocument(
            @Schema(description = "id of the task") UUID id, // 6
            @Schema(description = "name of the task", defaultValue = "Task name") @Size(min = 3, max = 255) String name, // 7
            @Schema(description = "task is done", defaultValue = "false") boolean done) {

    }

}
Annotations that I’ve used:
@Tag — defines whole API name and description (#1)
@Operation — defines single API operation (#2)
@ApiReponses — defines what responses our user can expect (#3)
@Parameter — defines information about parameters that API accepts (#4)
@Schema — used to describe objects that can be passed to our API and properties of these objects (#5)
@Size — this annotation is not from Spring Doc, it defines field validation, but it would also be displayed with our model
Our API definition looks like this now.

And TaskDocument defined in Schemas section of documentation.

Summary
Documentation is hard to maintain and something that developers are rarely willing to do. Thanks to libraries like Spring Doc it’s much easier to keep it up to date and share with other developers. It’s also easier for QA Engineers to consume endpoints and validate them.


The way you presented complex information so simply is remarkable. I admire your ability to convey such detailed information in an accessible way. merge fellas
Dinosaur Game is a fast-paced endless runner browser game by Google. Let's jump over obstacles, avoid collisions, and beat your high score today!
I really liked how you broke down the Swagger setup for Spring Boot 3 it made something that usually feels complex much easier to follow. The step-by-step approach and clear explanations are super helpful for developers at any level. I even took a quick break after reading to play a round of slope game, and came back refreshed to try it out. Great balance of clarity and practicality here.
Using Swagger with Spring Boot makes API testing much faster and reduces manual work. But after reading this, I feel like jumping into drift hunters instead
Thanks to libraries like Spring Doc it’s much easier to keep it up to date and share with other developers. It’s also easier for QA Engineers to consume endpoints and validate them. If you love strategy and a little bit of luck, Uno Online is the perfect addictive combination.