Automating Mobile Application Tests using Appium
- Dec 22, 2022
- 5 min read
By Kamil Baran, QA Engineer
The current state of the world revolves around the world of mobile apps.
With 5.22 billion unique mobile phone users worldwide (DataReportal, 2021), it’s no surprise that the mobile app industry is booming. Smartphone and app numbers keep growing at a steady pace, without showing any signs of slowing down in the near future.
In 2020, mobile apps were downloaded 218 billion times in total, up from 204 billion app downloads in 2019. Around 3.4 million apps are available for download in Google Play, while almost 2.09 million apps are available on the Apple App Store (TechCrunch, 2021). That’s why many companies invest in the development of mobile apps. It also creates some challenges for the whole developmental cycle, especially in terms of quality assurance. How to test these apps in the most efficient way? Manually repeating tests is costly and time consuming.
Once created, automated tests can be run whenever needed, and are much faster than manual tests. Automated software testing can reduce the time to run repetitive tests from days to hours (e.g. a round of over 200 regression tests run before releasing a new version of the key app in Kitopi used to take roughly 6-12h when done manually, whilst now, it takes around 40 min). Not to mention, it also ensures the QA engineers' sanity of mind - because no one likes repeating the same set of tests for the 50th time.
In this article, I will demonstrate how we automate mobile application tests in Kitopi using Appium and Python.
What is Appium?
Appium is an open-source tool for automating native, mobile web, and hybrid applications on iOS mobile, Android mobile, and Windows desktop platforms. It’s one of the most popular tools for automating mobile apps used nowadays.
It uses JSONWireProtocol internally to interact with iOS and Android apps using Selenium WebDriver. It supports Android via UIautomator, iOS via UI Automation, and mobile web as Selenium driver for Android and iOS.
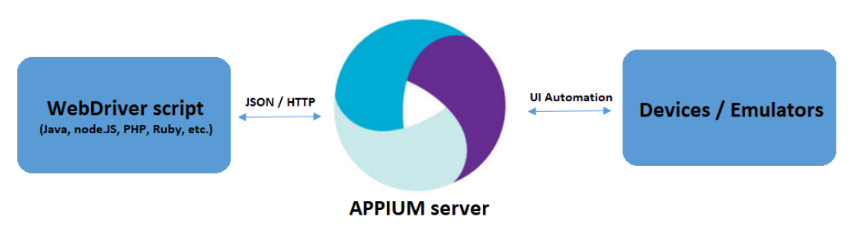
One of the biggest advantages of Appium is that you can write your tests in almost any programming language (e.g. Java, Objective-C, JavaScript, PHP, Ruby, Python, or C#, etc). It’s open-source and has a large community of people involved. Also, it’s easy to use Appium in mobile app testing, if you are familiar with Selenium. They use the same WebDriver, and DesiredCapabilities is used in the same way. Configuring an application to run test scripts using Appium has a lot of similarities to Selenium.
For mobile testing in Kitopi, we use Appium and virtual devices created in Android Studio. Test scripts are written in Python, using Pytest.
Example time! All configuration and running tests in the example below will be done on a virtual device on a computer, but it can also be run on an actual mobile phone.
Let’s prepare a sample test for an Android app. In order to do so, we need three key elements: a debug version of the app, a device to run the app on, and the Appium server.
1. First, we should create a virtual device. We will use Android Virtual Device Manager, a tool from the Android Studio package. You can check this simple tutorial on how it’s done in Android Studio. When it’s built, we have to install our app simply by swiping from our folder to the emulator.

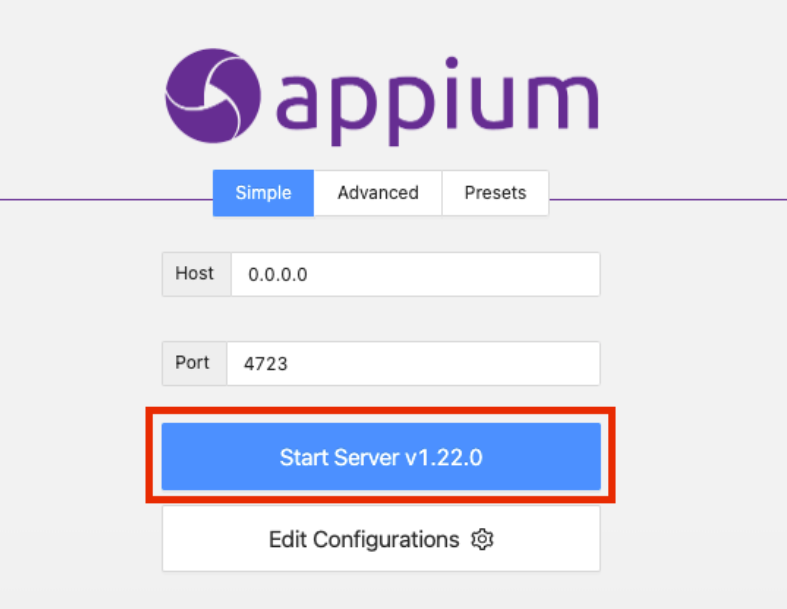
2. Now, let’s run an Appium server
3. We should also run an Appium Inspector - a tool for finding elements and recording interactions between elements. Configure it by setting up “desired capabilities” to create a session with the devices under test. Desired Capabilities are keys and values encoded in a JSON object, sent by Appium clients to the server when a new automation session is requested.
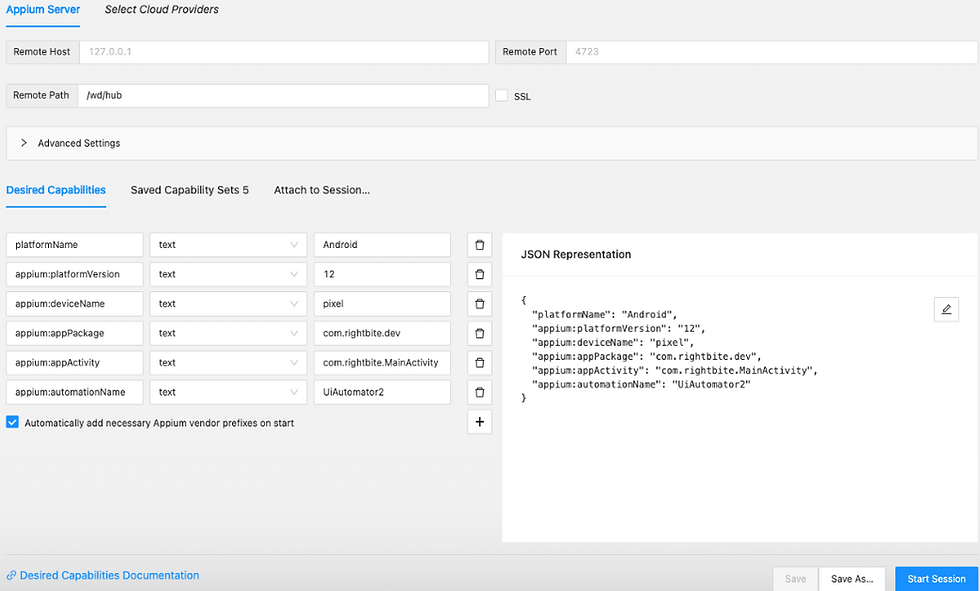
4. Having started the session, we can use Appium Inspector’s tools to interact with the app. You can:
Interact with elements (click, send keys, or clear).
Get a list of suggested element locator strategies and selectors to be used in your scripts.
Start and stop the "recording" mode, which translates your actions in the Inspector to code samples you can use in your scripts.
Perform a swipe gesture.
Switch between web and native context (hybrid apps) and interact with web elements.
Writing a test
We will use one of Kitopi’s mobile apps to write an example test.
In this case, when we open the app, we are presented with a location selection screen. We can proceed with the “tap” action by tapping on the “choose location manually” button.
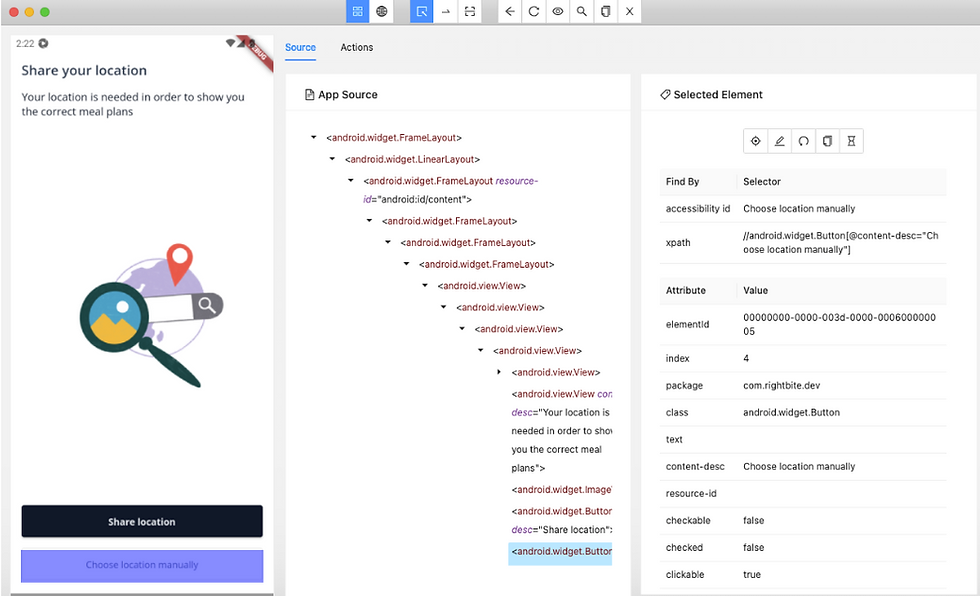
We can hit the “record” button to record all the actions, and afterwards, we can copy the recorded actions as code in the language of our choice, and paste it into our test code.
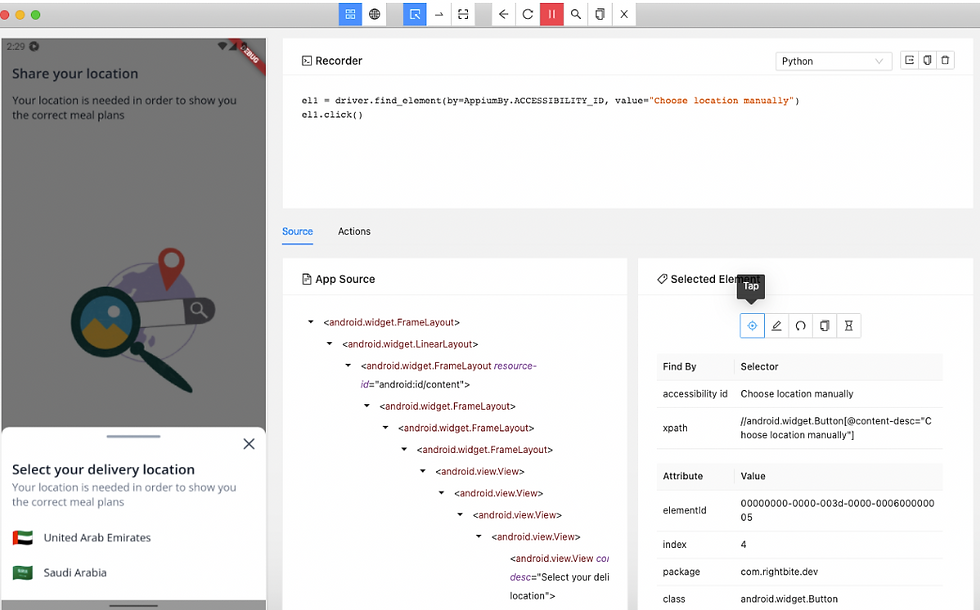
After recording all the necessary actions in our app, we can use the recorded data to create an automated test. You have to keep in mind that there are many selector strategies which can be used to identify an element. One of the best, is to use the “Accessibility ID” which is a unique identifier for a UI element. We can also use the “class name”, “ID”, “name”, or “XPath”, for example. Simply recording data in Appium Inspector can lead to having not-so unique Xpath locators, which, in turn, won’t allow locating the elements if after some time small changes have been made to the UI, and are not even recommended by the Appium documentation. That is why you should manually change them afterwards, in order to have more flexible locators.
For the example above, we will use the ACCESSIBILITY_ID "Choose location manually" . In this case, I decided to follow the Page Object Model rules when creating the test, so all screens are divided into separate files, and described as separate pages.
Below is an example of a class describing the location screen previously shown in Appium Inspector.
The base page used in the test:
class BasePage:
    	def __init__(self, driver: WebDriver):
        self.driver = driver
        self.wait = WebDriverWait(self.driver, 20)
        self.ec = EC

    	def wait_for_page_to_load(self):
        self.wait.until(lambda _: self.loaded)
        return self

    	def is_element_displayed(self, strategy, locator):
        try:
            return self.driver.find_element(strategy, locator).is_displayed()
        except NoSuchElementException:
            return False

    	def wait_until_element_visible(self, locator):
        self.wait.until(ec.visibility_of_element_located(locator))

      def scroll_to_element(self, web_element):
        self.driver.execute_script("arguments[0].scrollIntoView(true);", web_element)

      @property
      def loaded(self):
         raise NotImplementedError('Each Page should implement its own loaded() method')
And the Location Page class:
class LocationPage(BasePage):
    _location_picker = (AppiumBy.ACCESSIBILITY_ID, "Choose location manually")
    _region = (AppiumBy.ACCESSIBILITY_ID, "🇦🇪\nUnited Arab Emirates")

    @property
    def loaded(self):
        return self.is_element_displayed(*self._location_picker)

   def choose_location(self):
      self.wait.until(self.ec.visibility_of_element_located(self.location_picker)).click()
      self.wait.until(self.ec.visibility_of_element_located(self._region)).click()
When we have pages described, we have to provide a driver object to be able to interact with the app and execute the test script. In our test, the driver is created as a fixture in the conftest file, so it’ll be initialized upon test start, before executing any of the test steps.
@pytest.fixture(autouse=True)
def driver(request):
    driver = Remote('http://localhost:4723/wd/hub', dict(
        platformName='Android',
        platformVersion='12',
        newCommandTimeout=3000,  # for debug
        deviceName=config.android_emulator_name,
        app=config.android_apk_path,
        appActivity='com.rightbite.MainActivity',
        appPackage='com.rightbite.dev'
    ))
    session = request.node
    cls = session.getparent(pytest.Class)
    setattr(cls.obj, "driver", driver)
    yield driver
    driver.quit()
Et voilà! Our actions in the app are translated into a piece of code that can now become a test, run whenever needed.
By repeating the above steps for the whole test scenario, and creating a class for each individual page, I've eventually ended up with this test:
class TestUserPreferences(TestBase):

    	def test_log_in_and_update_nationality(self):
      """User logs in and changes nationality"""
      LocationPage(self.driver).wait_for_page_to_load().choose_location()
      StartPage(self.driver).wait_for_page_to_load().click_log_in()
      LoginPage(self.driver).wait_for_page_to_load().log_in('rb21@mailinator', 'Test123$')
      MealPlanPage(self.driver).wait_for_page_to_load().click_user_account_button()
      user_page = UserPage(self.driver).wait_for_page_to_load()
      user_page.go_to_personal_information()
      personal_info_page = PersonalInfoPage(self.driver).wait_for_page_to_load()
      personal_info_page.change_nationality('Arabic').click_confirm()
      user_page.go_to_personal_information()
      personal_info_page.assert_changed_nationality('Arabic')
      personal_info_page.change_nationality('Albanian').click_confirm()
      user_page.click_log_out()
Conclusion
Appium gained popularity within a short span of time after its introduction, and has won numerous awards for mobile testing software. Appium can be used to test all types of mobile apps (Native, Web, and Hybrid).
To sum up, the key features of Appium are:
It’s a cross-platform tool, therefore test scripts can be written for both iOS and Android using the same API. This feature also helps the testers to reuse code between iOS and Android test scripts.
It supports test automation on emulators, simulators, and on real mobile devices.
It supports multiple programming languages, including Java, C#, Objective - C, JavaScript with Node.JS, Python, PHP, Ruby, Clojure, and Perl.
It’s free and open-source, with a large and involved community.
Apart from these features, Appium is simply fun to learn and to work with.


Thanks for explaining the process so clearly. Completing the survey at survey.walmart.com with receipt is a simple way to share honest opinions about Walmart services.
Great explanation of how streetwear has evolved over time. The way you highlighted Stussy as a key player in modern fashion is very accurate and well written. It’s impressive how the brand connects simplicity with bold urban identity, making it popular among younger audiences. Your discussion about casual wear, layering, and minimal style really shows how fashion is changing today. Stussy continues to influence both designers and everyday fashion lovers worldwide. This article is helpful for understanding how streetwear became a global trend and why it continues to grow in popularity across different fashion markets.
Great article, really enjoyed the insights shared here. The way you explained modern streetwear and comfort-focused fashion is very clear. Essentials has become a strong part of today’s lifestyle because people now prefer simple, minimal, and versatile clothing. Your explanation about how everyday outfits are evolving really makes sense. It’s interesting to see how Essentials pieces are now used in both casual and trendy styling. This post is very helpful for fashion lovers who want to understand modern wardrobe choices and how comfort and style can work together in a balanced way.
Hello, I’m a Salesforce learner passionate about CRM technologies and cloud-based platforms. I completed Salesforce Training in Hyderabad at FITA Academy, where I acquired practical knowledge in workflow automation, data management, and application customization. I am interested in solving business challenges, exploring new software tools, and supporting organizations with efficient CRM solutions.
Great and informative post. I really like how the topic is explained in a clear and simple way. Content like this helps readers better understand treatments, whether learning about medicines such as Dapoxetine or Sildenafil or exploring reliable health information.